Properties and Settings
The available properties include options such as “container”, “fetch”, “scheduler”, “traffic-gen”, “ipsec”, “pptp”, among others.
The “activation-timeout” property sets the time to activate the reset button or turn off the device.
You can also enable or disable the “flagged” state that indicates a possible intrusion.
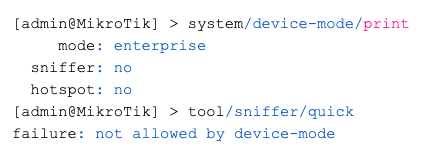
[admin@MikroTik] > system/device-mode/print
     mode: enterprise
  flagged: yes
  Sniffer: No.
  hotspot: no
Peripheral Changes
Specific changes can be made for each feature controlled by device-mode. For example, change “home” mode and enable email:
[admin@MikroTik] > system/device-mode/update mode=home email=yes
“Flagged” status
RouterOS scans the configuration at startup to detect intrusions. If a suspicious configuration is detected, it is disabled and set to a “flagged” state.
This imposes limitations, and certain actions, such as bandwidth testing or traffic generation, are not allowed.
[admin@MikroTik] > system/device-mode/print
     mode: enterprise
  flagged: yes
  Sniffer: No.
  hotspot: no
To exit the “flagged” state, use the command “/system/device-mode/update flagged=no”. It is crucial to audit the configuration before exiting the flagged state to ensure system integrity.
Conclusion
The “Device-mode” in MikroTik RouterOS provides an additional layer of security and customization, allowing network administrators to set specific limitations and detect intrusions.
By understanding how it works and how to apply specific settings, users can strengthen the security of their MikroTik devices and maintain finer control over enabled features.