One of the newest and most promising VPN technologies is wire guard, which has gained recognition for its simplicity and efficiency compared to traditional solutions. MikroTik RouterOS Incorporates support for WireGuard, making it easier to implement this technology in a variety of scenarios.
At the end of the article you will find a small test that will allow you assess the knowledge acquired in this reading
What is WireGuard?
WireGuard is a relatively new, open source VPN tunneling protocol that has become very popular in recent years due to its simplicity and efficiency. It was designed with a focus on ease of setup and maintenance, as well as superior performance compared to older VPN technologies such as IPsec and OpenVPN.
WireGuard Key Features:
- Simplicity: WireGuard is made up of less than 4,000 lines of code, making it easy to review and audit security. This makes it less prone to errors and vulnerabilities.
- Efficiency: Thanks to its efficient design, WireGuard can deliver superior performance even on more modest hardware.
- Safety: WireGuard is based on modern cryptography and uses elliptic curves to provide strong security. It has been designed with a focus on security and attack prevention.
- Flexibility: It can be used on a wide variety of operating systems, including Linux, Windows, macOS, Android, and iOS.
WireGuard implementation in MikroTik RouterOS
Deploying WireGuard on MikroTik RouterOS via the command line interface (CLI) can be done by following these basic steps.
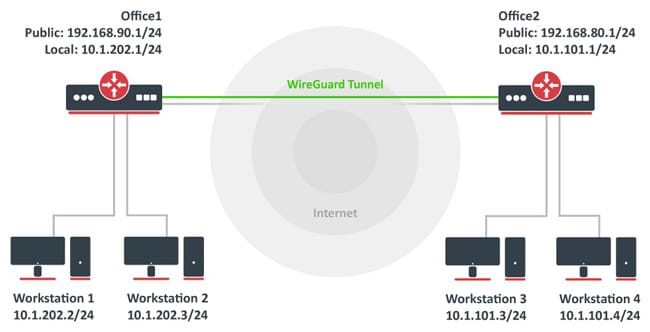
This example provides a simple configuration to establish a VPN tunnel between a WireGuard server on MikroTik and a remote client. Remember to adapt specific settings, such as IP addresses and keys, to your own environment.
1. RouterOS Update
Make sure your MikroTik device is updated and supports WireGuard. To do this, you can check and update your version of RouterOS from the “System” and “Packages” menu in WinBox or through the CLI with the command /system package update check-for-updates and then /system package update install.
2. Key Generation
Generates a key pair (public and private) for the server and client. On the MikroTik device (server), use the following command to generate the keys:
/tool wireguard key generate
/tool wireguard key print
3. WireGuard Interface Configuration
Configure the WireGuard interface on the MikroTik server with the generated private key and define a listening port. Replaces GENERATED-PRIVATE-KEY with your real private key.
/interface wireguard add name=wg0 listen-port=51820 private-key=GENERATED-PRIVATE-KEY
4. Peer Configuration
Adds the client device as a peer on the server, specifying the client's public key and the IP address to be assigned to the client within the VPN tunnel. Replaces CLIENT-PUBLIC-KEY with the client's real public key and CLIENT-IP with the desired IP address for the client within the VPN.
/interface wireguard peers add interface=wg0 public-key=CLIENT-PUBLIC-KEY allowed-address=CLIENT-IP/32
5. Assignment of IP Addresses and Routes
Assign an IP address to the WireGuard interface on the server and configure the necessary routes. For example, if you want the server to have the address 10.0.0.1 inside the VPN tunnel:
/ip address add address=10.0.0.1/24 interface=wg0
Configure routes if necessary, depending on your network and how you want traffic to flow through the VPN tunnel.
6. Firewall Configuration
Make sure to allow UDP traffic for the WireGuard port (default, 51820) on the MikroTik firewall:
/ip firewall filter add action=accept chain=input protocol=udp port=51820
7. Client Configuration
On the client device, you will need to perform a similar configuration, including creating a WireGuard interface, generating keys (if not already done), and configuring this interface with the client's private key and specifying the MikroTik server as your peer with the server's public key.
Remember that each environment is unique, and these steps may require adaptations. Additionally, it's always important to consider security and privacy when setting up VPNs, ensuring only authorized devices can connect.
Advantages of WireGuard in MikroTik RouterOS
Implementing WireGuard on MikroTik RouterOS offers numerous benefits, including:
- Simplicity: Configuring WireGuard on MikroTik is simpler compared to more complex VPN technologies, reducing the risk of configuration errors.
- Efficiency: WireGuard is designed to be efficient in terms of resource usage, which means lower CPU consumption and higher speed.
- Safety: WireGuard uses modern cryptography and has been designed with a focus on security.
- Compatibility: WireGuard is compatible with a variety of operating systems, making it easy to deploy on a wide range of devices.
- Flexibility: You can set up site-to-site VPN connections, individual user remote access, or even use WireGuard as an additional security layer on your mobile devices.
Common Usage Scenarios of WireGuard in MikroTik RouterOS
WireGuard on MikroTik RouterOS adapts to a wide variety of scenarios, including:
- Business Networks: Secure connections between remote offices and headquarters.
- Telecommuting: Allows employees to securely access company resources from remote locations.
- Security on Public Networks: Protection of mobile devices when connected to public or unsecured Wi-Fi networks.
- Site-to-Site Connections: Secure connections between geographically dispersed networks.
- Remote access: Secure access to the company network for remote users.
- Hosting Services: Provides an additional layer of security for servers and applications hosted in the cloud.
Conclusion
WireGuard on MikroTik RouterOS is a modern, secure and efficient VPN solution that makes it easy to create virtual private networks. Its simple design, high performance, and strong security make it an attractive choice for a wide variety of applications, from enterprise networks to individual user remote access.
If you value simplicity, efficiency, and security in your VPN solutions, WireGuard on MikroTik RouterOS is an option you should definitely consider.
Brief knowledge quiz
What do you think of this article?
Do you dare to evaluate your learned knowledge?
Recommended books for this article
(Book) Networking with MikroTik RouterOS: A Practical Approach to Understanding and Implementing RouterOS
Study material for the MTCNA Certification Course, updated to RouterOS v7
RouterOS v7 Advanced Routing Book
Study material for the MTCRE Certification Course, updated to RouterOS v7