4. Reply Only
The interface will only respond to requests originating from matching IP address/MAC address combinations that are entered as static entries in the IP/ARP table. No dynamic entries will be automatically stored in the IP/ARP table. Therefore, for communications to be successful, a valid static entry must already exist. To make a static entry in the ARP table use the following command:
/ip arp add address=192.168.1.2 mac-address=00:11:22:33:44:55 interface=ether1
This mode is useful for situations where you need to strictly control which IP addresses can be assigned to a specific interface. To enable reply only mode use the following command:
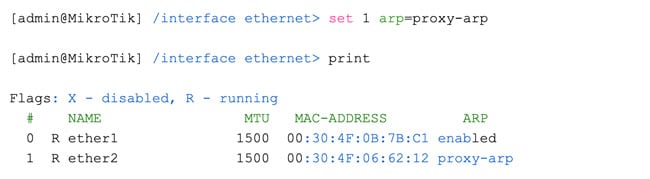
/interface ethernet set 0 arp=reply-only
This command configures Ethernet interface 1 to respond only to ARP requests.
5. Local Proxy ARP
When this mode is enabled on the router, Proxy ARP is performed to/from this interface only, that is, for traffic that enters and leaves the same interface. In a normal LAN, the default behavior is for two network hosts to communicate directly with each other, without involving the router.
With local-proxy-arp enabled, the router will respond to all client hosts with the MAC address of the router interface instead of the MAC address of the other host. The Router performs ARP proxy on the interface and sends responses to the same interface.
Let's look at the following example:
If Host A (192.168.88.2/24) requests the MAC address of Host B (192.168.88.3/24), the router will respond with its own MAC address. In other words, if local-proxy-arp is enabled, the router will take responsibility for forwarding traffic between Host A 192.168.88.2 and Host B 192.168.88.3. All ARP cache entries on Hosts A and B will reference the MAC address of the router. In this case, the router performs local-proxy-arp for the entire 192.168.88.0/24 subnet.
An example of RouterOS local-proxy-arp could be a bridge configuration with a DHCP server and bridge ports using the isolated option where hosts on the same subnet can communicate with each other only at Layer 3 through the bridge IP .
/interface bridge
add arp=local-proxy-arp name=bridge1
/interface bridge port
add bridge=bridge1 horizon=1 interface=ether2
add bridge=bridge1 horizon=1 interface=ether3
add bridge=bridge1 horizon=1 interface=ether4